Golden tips for learning professional mobile photography 2025
Since almost all smartphones these days have many features and capabilities for creating high-quality images, many businesses have been designed for photographers in different fields. If you also plan to work in this field, you should go through professional mobile photography training. In this article, we have comprehensively explained all the tips, dos and don’ts, equipment, and techniques that you need for professional mobile photography.
Nowadays, smartphone photography is of the same quality as professional cameras. This is due to their various practical features and capabilities. Also, because mobile photography is more affordable, most people choose it. Therefore, everyone is trying to find a comprehensive source for training in professional mobile photography in order to surpass their competitors in this field.
| Row | Tip | Description | Tools/Suggestions |
|---|---|---|---|
| 1 | Grid Line Activation | Follow the rule of thirds for better composition and balance in the photo. | Phone camera settings: Enable Grid Lines. |
| 2 | Manual focus adjustment | Stabilize focus on the subject for greater clarity and prominence in the photo. | Tap the screen to adjust focus and lock focus. |
| 3 | Proper lighting | Use natural or artificial light to highlight the subject. | Ring Light or daylight near the window. |
| 4 | Creative perspectives | Photographing from new and unusual angles for added appeal. | Lower or raise the camera for a new angle. |
| 5 | Playing with reflection | Using shiny surfaces like mirrors or water for creative effects. | Flat surfaces like glass tables or small basins. |
| 6 | Professional editing | Adjust lighting, contrast, and colors to improve image quality. | Software like Lightroom or Snapseed. |
| 7 | Negative space | Using empty space around the subject for added emphasis. | Simple and minimalist layout. |
| 8 | No digital zoom | To maintain photo quality, get closer to the subject instead of zooming in. | Use optical zoom (if available). |
| 9 | Symmetry and order | Symmetrical layout to create high visual appeal. | Arranging subjects in parallel or symmetrical lines. |
| 10 | Using HDR | To capture more detail in the bright and dark areas of the image. | Enable HDR mode in camera settings. |
Professional mobile photography training includes familiarizing yourself with the features and capabilities of Samsung and iPhone phones, professional photography techniques, types of photography such as product photography, how to take photos at home, advertising photography tips, and, in general, all the tips for learning mobile photography. So, if you also plan to take pictures like a professional photographer, stay with us until the end of this article.
Professional mobile photography training
Professional mobile photography training includes a series of photography tips and rules that you can follow to improve your photography skills. Some of these rules include:
- How to use grid lines
- Image balancing
- How to adjust camera focus
- Using negative space in a photography scene
- Finding different perspectives
- The power of reflection and photography with it
- How to zoom in on a subject
- How to capture small details with high-quality
- etc.
Below, we are going to explain all of these things to you one by one.
Tips for learning mobile photography
These tips can be used for any phone model or brand. Whether you’re shooting commercials or portraits, these rules and principles are applicable and important in any style, so review them carefully.
What camera should I get for mobile photography?
The first step in learning professional mobile photography is to get a phone with a high-quality camera. To capture high-quality photos, your phone’s camera must have a number of features, which are as follows:
- The mobile camera must have high quality, resolution, and sensor size.
- It has a stabilizer feature to prevent shaking during photography.
- Ability to manually adjust focus and depth of field.
- The quality of the lens and its aperture should be suitable for photography in different lighting conditions.
- It has HDR, panorama, and 4K video features.
- The phone’s processor power should be high.
- The battery life and storage capacity of the mobile phone should be standard.
How to activate and use Gridline
One of the most helpful tips for learning mobile photography is to use grid lines. Grid lines act as a guide to help you use the rule of thirds and take attractive photos of your subject.
The grid lines are actually two vertical and two horizontal lines that appear on your phone’s camera screen. According to the Golden Rule, the best location for your subject is one of the four intersections that these four lines create.
To enable gridlines on your iPhone, go to Settings, then select Photos & Camera. From there, you can allow the Grid to settings.
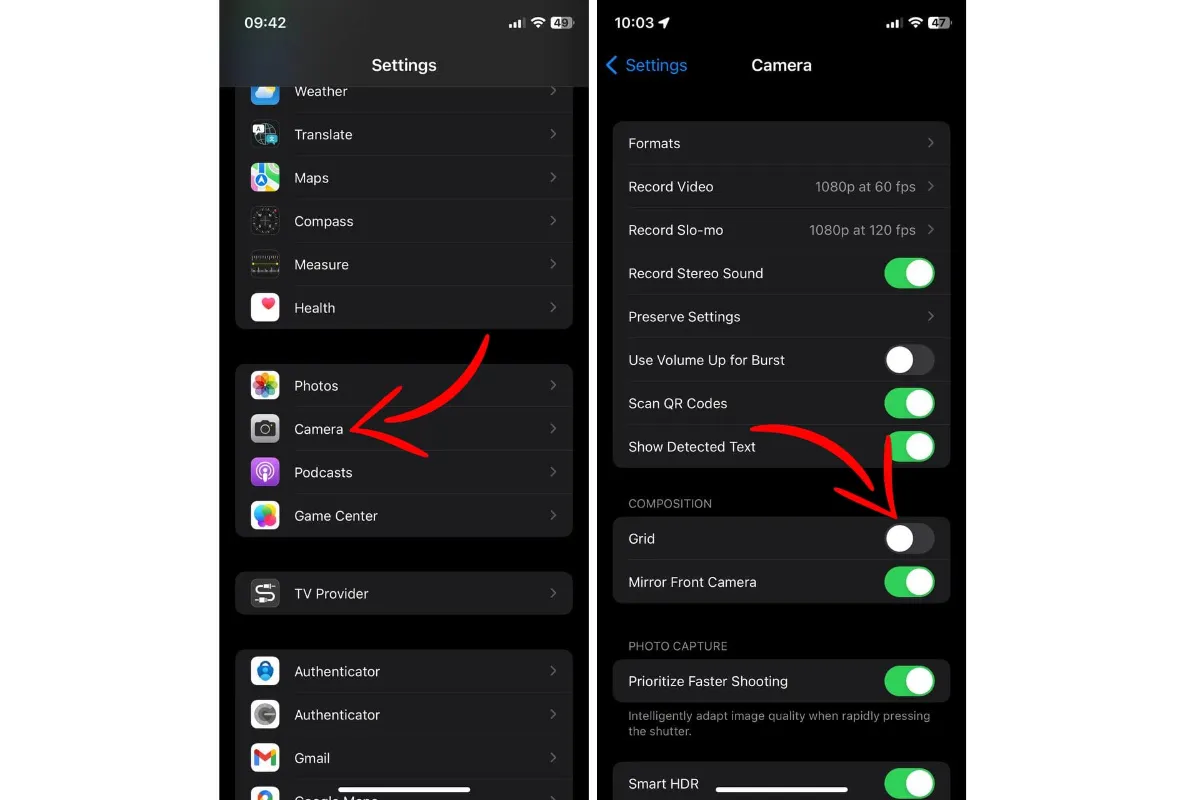
To enable grid lines on a Samsung phone, go to the settings section and enable the grid lines option at the bottom of the screen.
Focus adjustment in mobile photography training
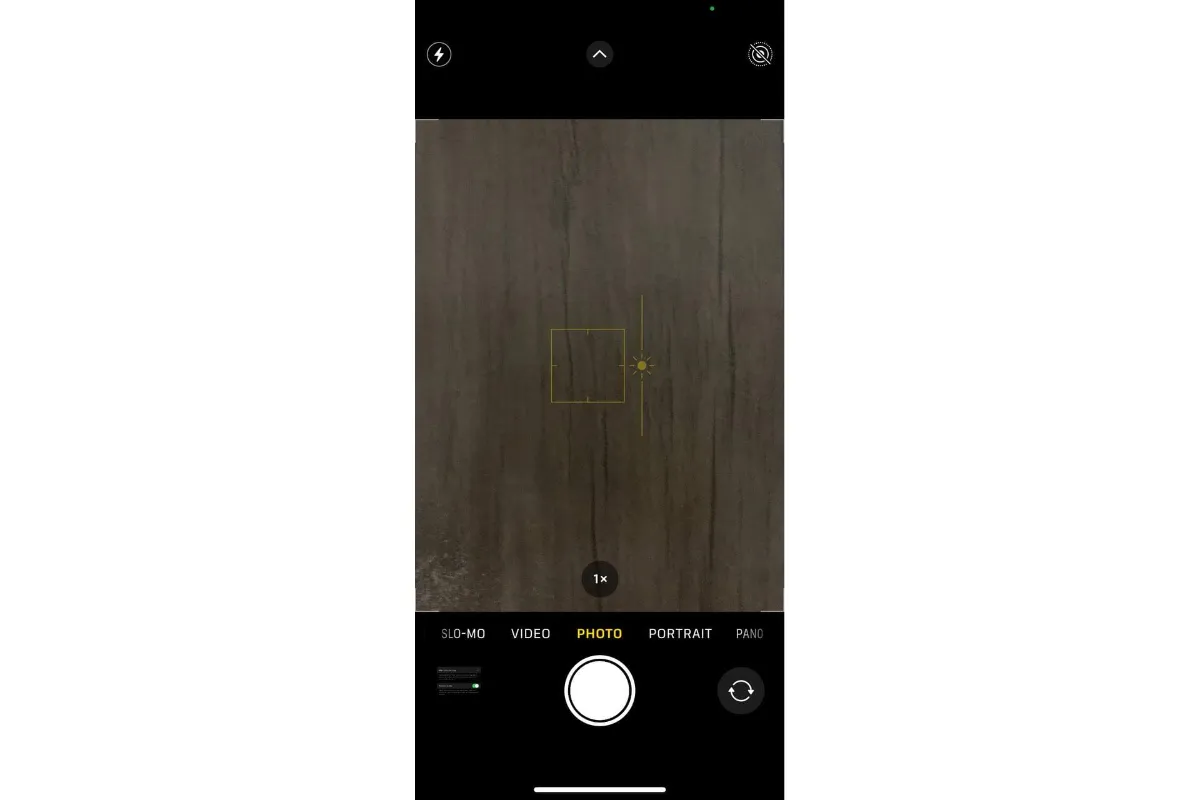
There are two types of focus in smartphones: manual and automatic. In automatic mode, the focus is on the background. Therefore, it is better to set the focus to manual mode so that you can focus on the desired subject. To focus, all you need to do is tap on the point you want on the screen until a yellow circle or square is created.
If you want your focus to stay in the same spot, you need to lock it. To do this, hold your finger on the place you want to focus. A lock icon will appear, indicating that your focus is locked at that point.
What is negative space, and what is its use?
Negative space refers to the area around the subject or subjects of photography, as well as the space in the background of the photograph. According to the rules of mobile photography training, there must be a proportion between the negative space and the subject to maintain the beauty of the photo. This does not mean that they must be completely equal—no! Sometimes, it is necessary to increase or decrease this proportion to increase the viewer’s focus and attention on the subject.
According to the golden rule in professional mobile photography, the best ratio between negative space and the subject is two-thirds. This means that it is better to fill two-thirds of the background with negative space because this way, the subject stands out more.
Using different perspectives in photography
Suppose you look at the photos of professional photographers. In that case, you will notice that one of the things they observe is the angle of the shot. Also, the reason their photos are so attractive is that they use angles that others would consider unreasonable and impossible.
As a professional photographer, you should try different angles to get amazing results. Most of the time, we look directly at our subject and shoot it as we see it. However, using different perspectives can make the final result much more interesting.
Choosing the right perspective will make your subject more understandable and impactful to the viewer, as you can more clearly portray its dimensions and size.
Mobile Photography Tutorial | Playing with Reflections
Seeing reflections in images has always fascinated the viewer. Hence, make the most of the situations where reflections are formed. For example, you have gone to nature, and there is a pond there. You can take amazing photos of images reflected in water. Some other accessories that you can use to create reflections and take photos are mirrors, sunglasses, drinking glasses, metal surfaces, water holes, etc.
Using order and symmetry in photography
Every human being loves order. Therefore, you can use this feature in your photography background design to attract the viewer. Especially if you have several photographic subjects, you can arrange them in order and symmetry and then take the photo.
Never zoom in on the subject.
One thing you should avoid when learning professional mobile photography is zooming in with the camera lens. Since smartphone cameras don’t have optical zoom, zooming in on a subject actually crops the image, reducing the image quality.
Instead of zooming in on your subject, it’s better to get closer and take a closer shot. You can even use an external lens to get close to your subject without sacrificing quality.
How do you photograph subject details?
As mentioned above, you can’t zoom in on your subject to show its details. On the other hand, close-up images that show the small, specific details of your subject are very interesting photos. If you want to capture the details and texture of your subject, you should get a macro lens and mount it on your phone camera.
Lighting in mobile photography training
The most important part of learning how to take professional mobile photography is using standard lighting. If you don’t want to spend money on a mobile phone, you should spend money on lighting instead. Lighting has a direct impact on the quality and beauty of your photos, so you shouldn’t skimp on anything.
If you plan to shoot outdoors and use natural light, it is best to do so early in the morning. However, if you plan to use artificial lighting, we recommend using a softbox instead of a ring light.
The intensity of the softbox light is much softer than the ring light light, and this affects the beauty of your photos. But if you plan to photograph a product, we recommend that you use a light tent or lightbox. In this device, the light is sufficiently and standardly placed on the subject, and the output of the photos will be of very high quality.
There is a very important point in professional mobile photography training regarding photographing products that have a glossy surface. These products may not give you high-quality output due to light reflection. Therefore, you should definitely use a diffuser as a lighting source to prevent light from reflecting off the product body. This way, you can capture the color of the products as you see them in the images.
Learning to photograph with a mobile phone using the long exposure method
If your shooting location has a light source around you, you should use the long exposure method. For example, if you want to photograph the sky during the day, you can set the shutter speed between 2 and 30 seconds to achieve the right lighting.
Mobile Photography Tutorial | Camera Settings
As mentioned many times, the mobile camera automatically has a series of preset settings. However, as a professional photographer, you need to change the settings manually according to the shooting environment. The things you need to adjust in photography are:
ISO: This section allows you to adjust the light sensitivity. Lower the ISO value to illuminate static or bright objects. On the other hand, the ISO value should be increased to photograph dimly lit or moving subjects. Be very careful when determining the ISO value, as shooting with a high ISO will cause noise in images or videos.
Shutter speed: When the shutter speed is slow, more light enters the camera, and the images become brighter.
White Balance: In this section, you can adjust the white balance of the photo. By changing this value, your image will become warmer or cooler.
Exposure: This option determines how much light reaches the camera sensor. Increase the exposure value if you are shooting in low-light conditions.
Learning to take photos with your mobile phone at home
Photography at home is always challenging because you have limitations to what you can take. But by learning how to take photos with your mobile phone at home and learning the basics and tips, you won’t have to worry anymore. Apart from the things mentioned above, namely, camera settings and proper photography principles, there are techniques that you can use to take professional mobile photos at home.
In learning to take professional mobile photography at home, your first step is to find an attractive location with suitable lighting for photography. Keep the photography scene you choose simple, unified, and appropriate for your photography subject. Now, you need to find a story for your photography subject. If you don’t have experience in this field yet, you can get help from other people’s photos.
Reviewing and viewing a large number of photos gradually reveals that each image has a story and how the photographer has depicted it. Over time, this will also help you generate ideas for storytelling and photography. The second point that you should not overlook is that you have many natural textures at home, such as stone, wood, fabric, etc. Using them as elements of the photography scene can increase the attractiveness of your photo many times over.
Another tip for learning professional mobile photography at home is to use everything you see around you. Flowers and plants are common in most homes. Mirrors are also common, and photography with mirrors can yield amazing results. The last tip is to use the flow of life and human emotions for your photos.
Teaching advertising photography with a mobile phone at home
Before we start teaching advertising photography with a mobile phone at home, you should know how important advertising photography with a mobile phone is.
You should always remember that your goal in learning advertising photography is to learn how to advertise and market products or goods so that you can attract more customers and sales. Being able to promote products well will help you attract customer attention and trust.
You can also explain such complex concepts to customers in simple language. Promotional photography showcases a product and brand’s strengths, which can greatly impact a business’s prosperity.
The points you should follow in learning advertising photography with a mobile phone at home are the same as those mentioned above. The only difference is that your goal is to build trust and brand. For this reason, you should be careful when choosing the colors you use for background design because each color has a specific meaning and creates different emotions in the audience.
For example, if you are planning to photograph products such as bedding, you can use yellow and green to convey a sense of calm and joy that suits the subject.
Mobile product photography tutorial
Online shopping has become very popular these days, and most people don’t leave their homes to shop. This has led to many jobs being created, including supporting online stores, managing stores, and photographing their products.
To be active in the field and photograph other people or your products, you need to acquire a series of skills. The article ” How to Take Product Photography with a Mobile Phone” comprehensively explains these techniques and tips, which will help you photograph products like a professional photographer.
The most important rule to follow when learning professional mobile photography is to photograph products in a way that is similar to the original. If your photo is inconsistent with the original product, the customer’s trust in that brand will be eroded, which is a disaster. To prevent this, you must be very sensitive and precise about lighting to take a realistic and high-quality photo.
Photography tutorial with Samsung mobile phone
Therefore, if you have a Samsung phone or are planning to buy one and want to start taking photos with it, you should learn how to take photos with Samsung mobile phones and their key points.
Samsung-brand phones have high-quality cameras, various lenses, and photography capabilities that allow users to take photos freely. The most important thing in learning to take pictures with a Samsung mobile phone is to become familiar with the operation of the lenses and camera settings. Although this phone has many features, if you can’t use them for professional photography, then what good is buying it?!
Once you enter the professional camera section, you will need to adjust a number of settings manually. These include:
- Timer
- Resolution
- Different modes, such as night, food, and nature
- HDR
- Shutter speed
- Aspect ratio
- Effects
iPhone photography tutorial
The biggest advantage of iPhones is their high-quality cameras. They may not have as many features as a Samsung phone camera, but they will deliver good results. A large percentage of bloggers use this phone camera to produce their content.
Unlike the Samsung phone camera, which is easy to use, the iPhone’s operation and settings are a bit complicated. To use the iPhone camera for photography, you need to know the tips for learning how to take photos with an iPhone.
In the iPhone photography tutorial, editing and changing the color settings of the photos is the last step. Still, it is better to make color corrections at the beginning of the photo shoot from the professional camera settings section to capture higher-quality photos. Keep in mind that you will need to readjust these items in each location because not every environment has the same lighting conditions.
Learning to take photos with an iPhone is very important. You should know how to use each camera lens. The iPhone camera has three cameras, each with a different function. If you want to take photos like a professional, you need to know these differences.
The latest iPhone model, the iPhone 15 Pro, has 3 cameras with 7 lenses. These lenses are responsible for changing the viewing angle and are as follows:
- Macro lens
- 13mm ultra-wide lens with f/2.2 aperture
- 24mm lens with f/1.78 aperture (main camera)
- 28mm lenses
- 35mm lens
- 48mm 2x zoom lens
- 77mm lens with f/2.8 aperture
- 120mm lens with f/2.8 aperture (only the Pro Max version has this lens)
Professional mobile photography tutorial | Photo editing
There are various photo editing software, the best of which we have listed below. In this section, we will explain how to edit photos professionally with Snapseed software. We chose this software because it can be run on both Android and iOS operating systems.
The steps for editing photos in Snapseed are as follows:
After adding the desired photo to the software, you need to select Tune Image from the tools section and make color corrections to your photo.
- Brightness: From this section, you can adjust the darkness and brightness of the image.
- Contrast: Contrast refers to the difference in color and brightness of an image. As the contrast increases, the separation between the dark and light parts of the image also increases.
- Saturation: As the color saturation increases, the intensity of color separation increases.
- Highlights: From this section, you can change the intensity of the bright areas.
- Shadows: As shadows increase, dark areas become more pronounced.
- Warmth: From this section, you can change the temperature of the photo.
- White balance: From this section, you can adjust the white balance of the image.
- Edge Enhancement: From this section, you can adjust the image texture and sharpness.
The settings described above work the same way in all editing software.
Introducing the best photo editing software
As mentioned above, the last step in learning professional mobile photography is editing images. Therefore, this section introduces the best photo editing software to improve the quality and beauty of your photos.
The best photo editing apps for iPhone
- Halide Mark II: This software’s standout feature is its ability to increase focus to fifteen-second exposures. It also supports the ProRaw format.
- FiLMiC Firstlight is one of the best iPhone software applications because it offers many photo editing features.
- Adobe Lightroom: Adobe Lightroom is a great choice for color correction in photos. This program allows you to edit images professionally.
- VSCO is one of the most popular iPhone apps. Its attractive feature is that it allows you to simulate an old look for images and videos.
- Darkroom: The user interface of this software is very simple and has a RAW editor and content-aware frames. Another attractive feature of this software is its support for ProRAW and HDR formats.
The best photo editing software on Android
- Google Camera: This app has a simple interface that is suitable for both professionals and beginners. Its attractive features include Night Sight and Super Res Zoom.
- Camera MX: This software is useful because it is regularly updated and features are added. It also has all the image editing tools.
- Pixtica: This application is also popular among editors due to its many useful features. One of its attractions is that it has several manual focus modes.
- ProCam X: This software’s standout feature is its social networking features, such as filters and stickers. You can also manually adjust focus, ISO, white balance, etc.
- Open Camera: Unlike other software, this program allows you to take high-quality photos with auto mode. One of its outstanding features is its noise reduction and dynamic range capabilities in the dark.
Final words
In this article, we have explained in detail all the tips and rules of professional mobile photography. After reading this article, you can take professional mobile photography in any style, including industrial and portrait. We have also explained how to take photos with a Samsung iPhone and what software you need. We hope you enjoyed this article.




It was great, thank you very much for your good content.
Hello, don’t be bored, the content is interesting.
Hello
Well, everyone knows this.
Thank you very much
It was great
Very useful and excellent, thank you
The content was good and useful. By following some of these tips, you can really get beautiful photos.